The Space
The area that I transformed into a cozy reading nook was a dusty corner of our basement next to our home’s HRV system. We had to build a wall around the HRV to close it off from the finished area of our basement. However, we weren’t able to extend that wall across the room as it would have cut off the only existing window in the room. What resulted was a small awkward space 76” wide by 40” deep. That sounded like the perfect size for a generous reading nook. I love design challenges and how they force us to devise creative ideas and solutions to dilemmas.
Purchasing Materials
I updated the materials list, scoured my leftover lumber pile to salvage anything usable, and went to Home Depot to pick up the remaining lumber. I didn’t purchase the plywood for the drawers right away as the plans recommend completing the frame first to confirm the actual sizes of the drawer openings. Also, I always purchase plywood from a different supplier, KJP Select Hardwoods in Ottawa as they have great quality Baltic Birch plywood. It’s fine-grained and very strong and when it’s painted, it has a smooth appearance.
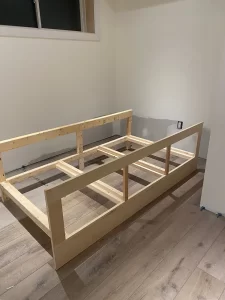
Cutting and Assembling the Pieces
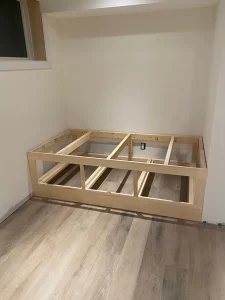
I spent about half an hour cutting the pieces and laying out the fronts and backs of the frames.
Next, I used my brand-new Kreg Jig 720 to fasten the pieces together. This was my first time using the Kreg jig and once I get more experience using this tool, I plan to share my experiences with you. I have coveted this tool for a while but felt that it might be too expensive or too difficult to use, but it turned out to be neither of those things. It’s a great tool to own and I can’t wait to use it on additional projects. I also purchased the Pocket Hole Screw Kit. The first thing I did was to assemble the front and back of the frame.
Click for more info about Pocket-Hole Jig 720PRO Click for more info about Kreg 1 in. to 2-1/2 in. Square Drive Round Head Pocket-Hole Screw Kit (675-Pack) SK03 – The Home … Click for more info about allen + roth 2-1/2-in Center to Center Matte Black Novelty Cup Drawer Pulls
Next, I joined the front and back together with the connecting pieces. While I worked, I checked to ensure that the frame I was building fit perfectly in the nook where I planned to install it in case I needed to make some small adjustments. It only took about one hour to assemble the frame and place it in the opening.
Constructing the Drawers and Finishing Up
Next, I measured the three drawer openings and the top area to order the plywood from KJP Select Hardwoods. They were able to cut the top piece to my specifications and the drawer pieces were cut in strips that I could easily cut down to size with my compound mitre saw. I don’t have a table saw so I appreciate companies that offer custom cuts at a reasonable price.
I assembled the drawers very quickly and checked to make sure they fit properly into the openings. They did not. Needless to say, I had to do a lot of sanding and chiselling to make them fit properly and slide easily. At this point, I never want to see a chisel ever again.
It was then time to apply the decorative moulding to the drawer fronts. Next, I primed and painted the drawer fronts and the front and top of the daybed.
I added some drawer pulls from Lowes to the fronts of the drawers and placed them into the openings. Finally, I added the top and a small piece of trim just below the overhanging top (the top overhangs by 3/4″) using brad nails. I will be adding baseboard trim when I do the baseboards for the entire room.
Painting the Bench
Because the bench is made entirely of raw wood, it was necessary to apply a paint primer designed for raw wood. I used two coats of primer, then painted the entire unit with Benjamin Moore Chantilly Lace (semi-gloss). This is the same paint I will use for the baseboard and window/door trim. Two coats were sufficient to produce a smooth finish with full coverage.
Bench Cushion
I found a clever and affordable shortcut for the bench cushion. IKEA carries twin bed mattresses that are the exact size of the frame I constructed. The mattress I selected is the Agotnes Twin Foam Mattress and it’s 10 cm tall. The dimensions make it suitable for a benchtop application. It was very affordable at only $99 CAD or $69 USD. Making a foam bench cushion from scratch would have cost much more than this. I plan to make a washable cover for the cushion and add some decorative pillows.
– The Final Result
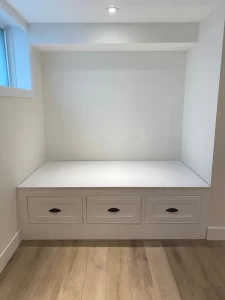
I’m pleased with the final result and can’t wait to decorate this reading nook with fabrics, artwork or wallpaper, and lots of books! Plus, the drawers are huge and will be perfect for storing much of my Christmas decor.